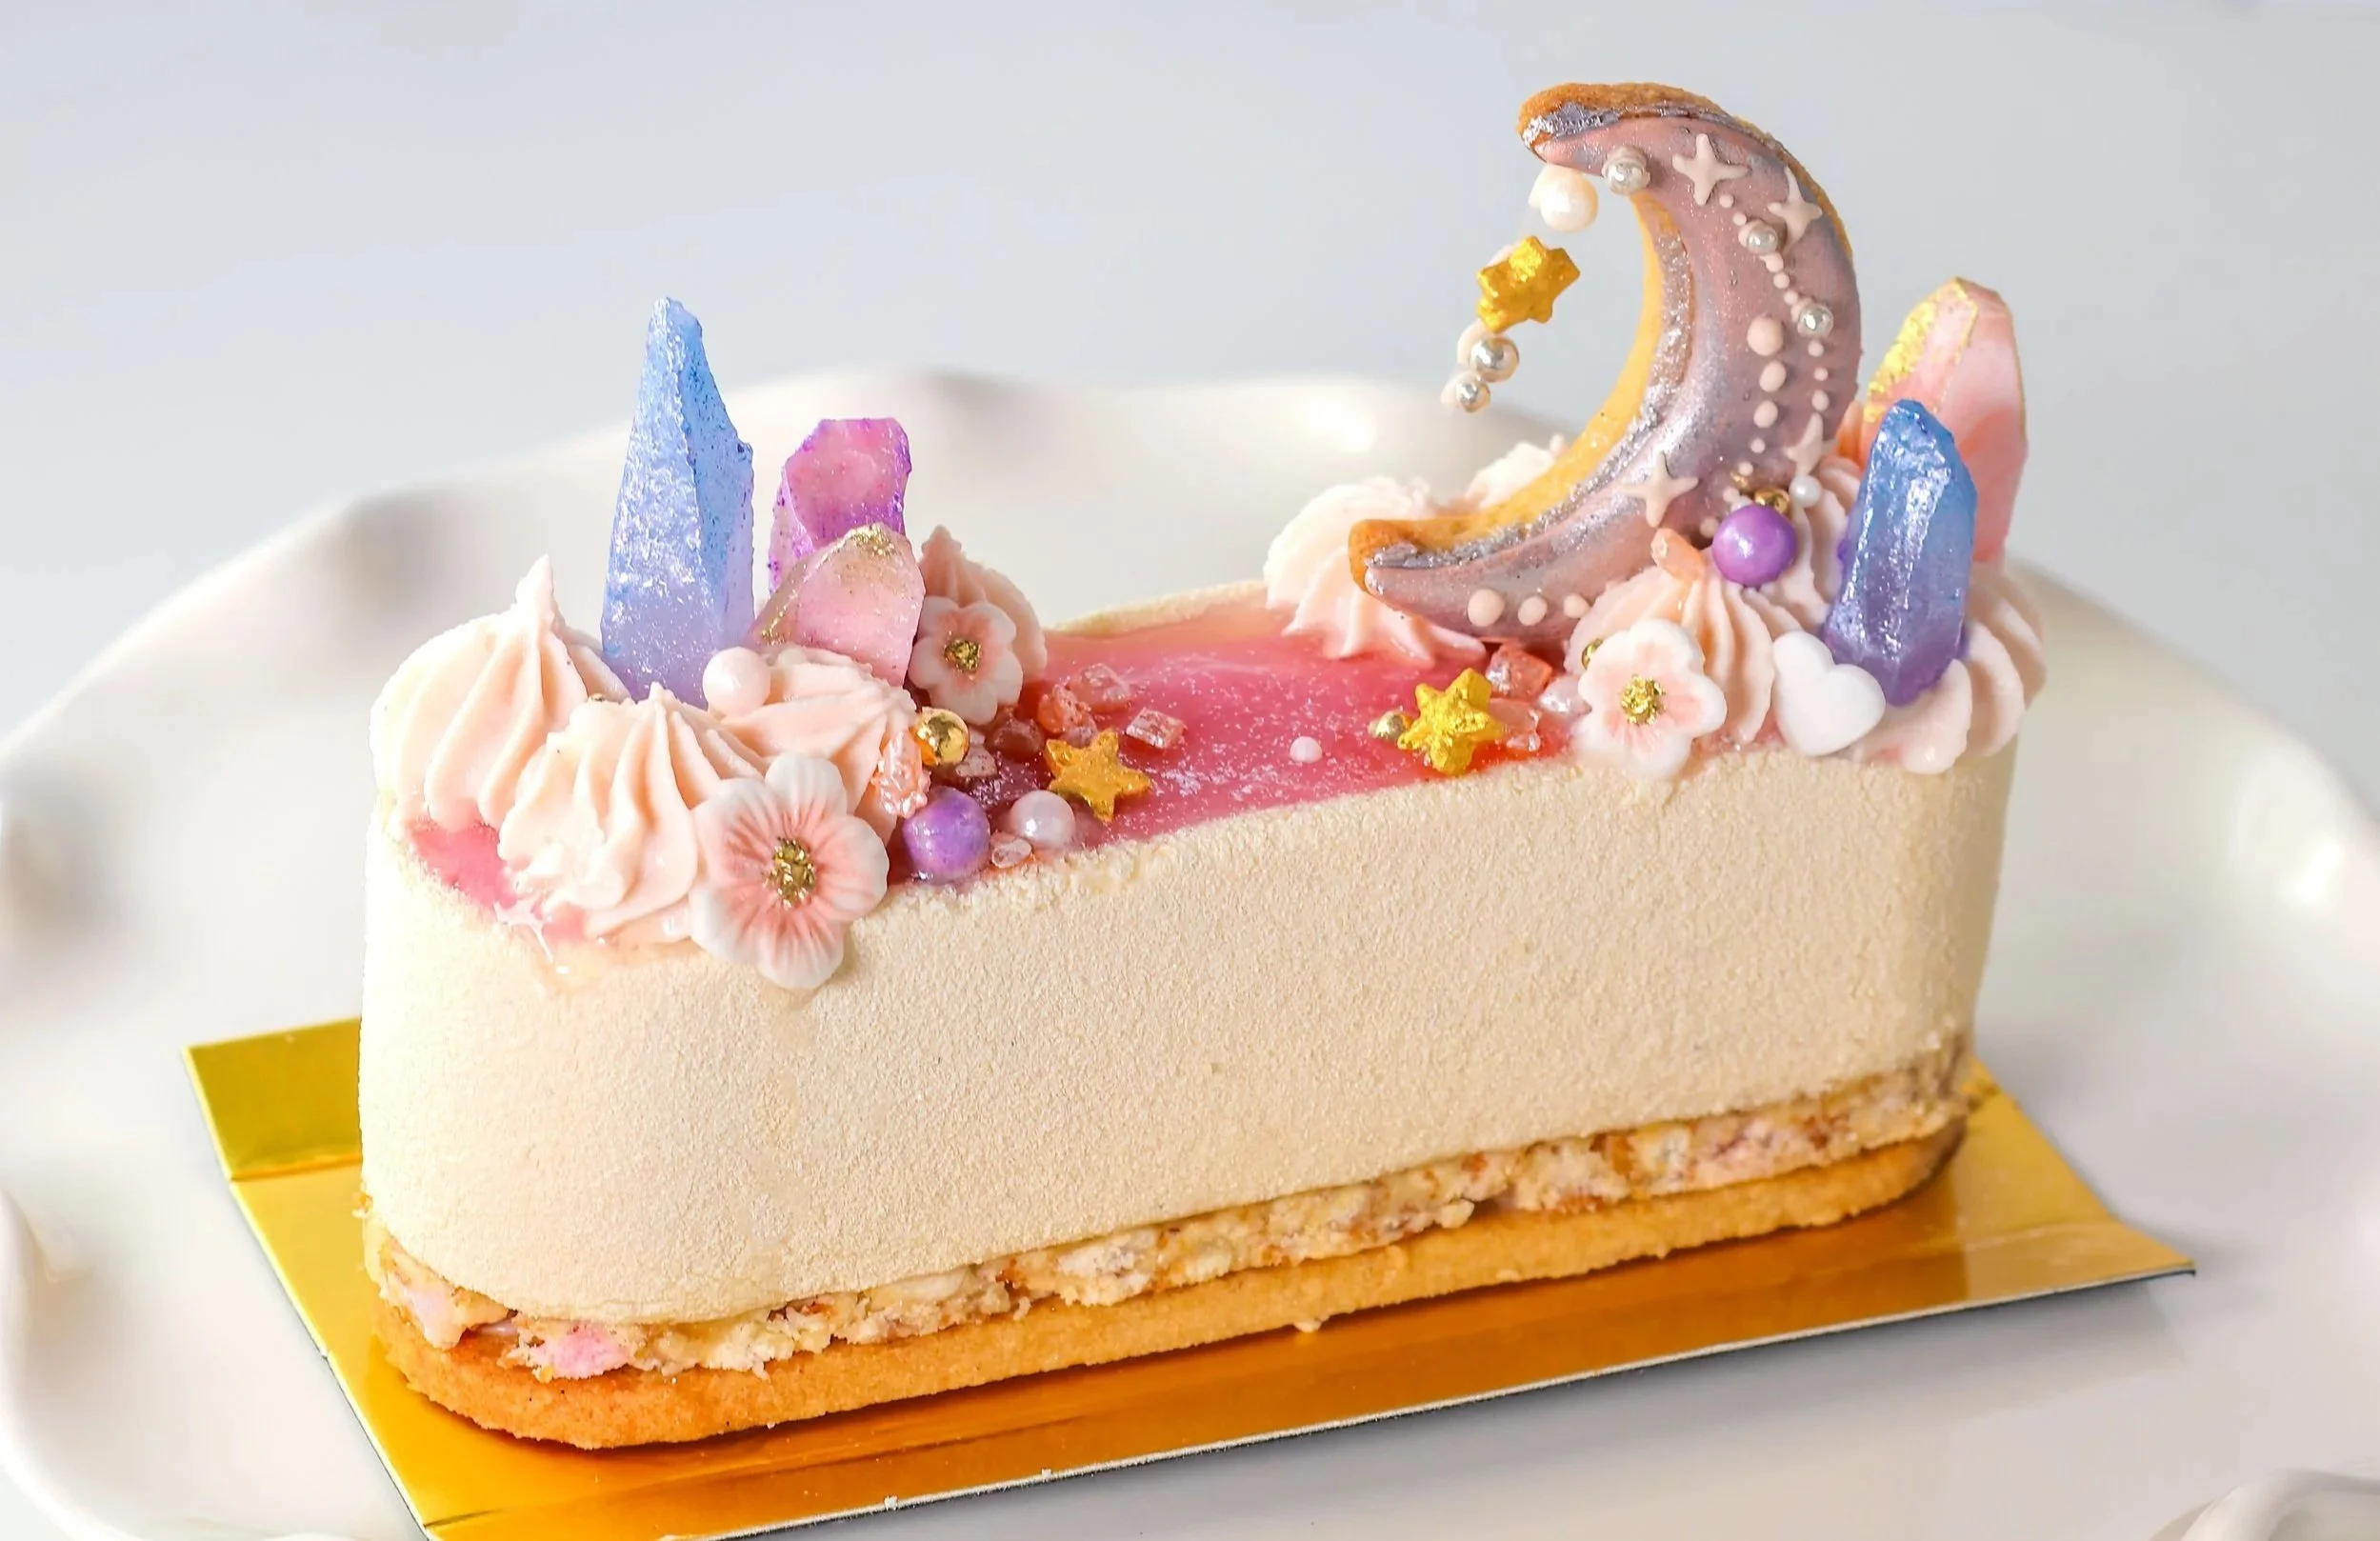
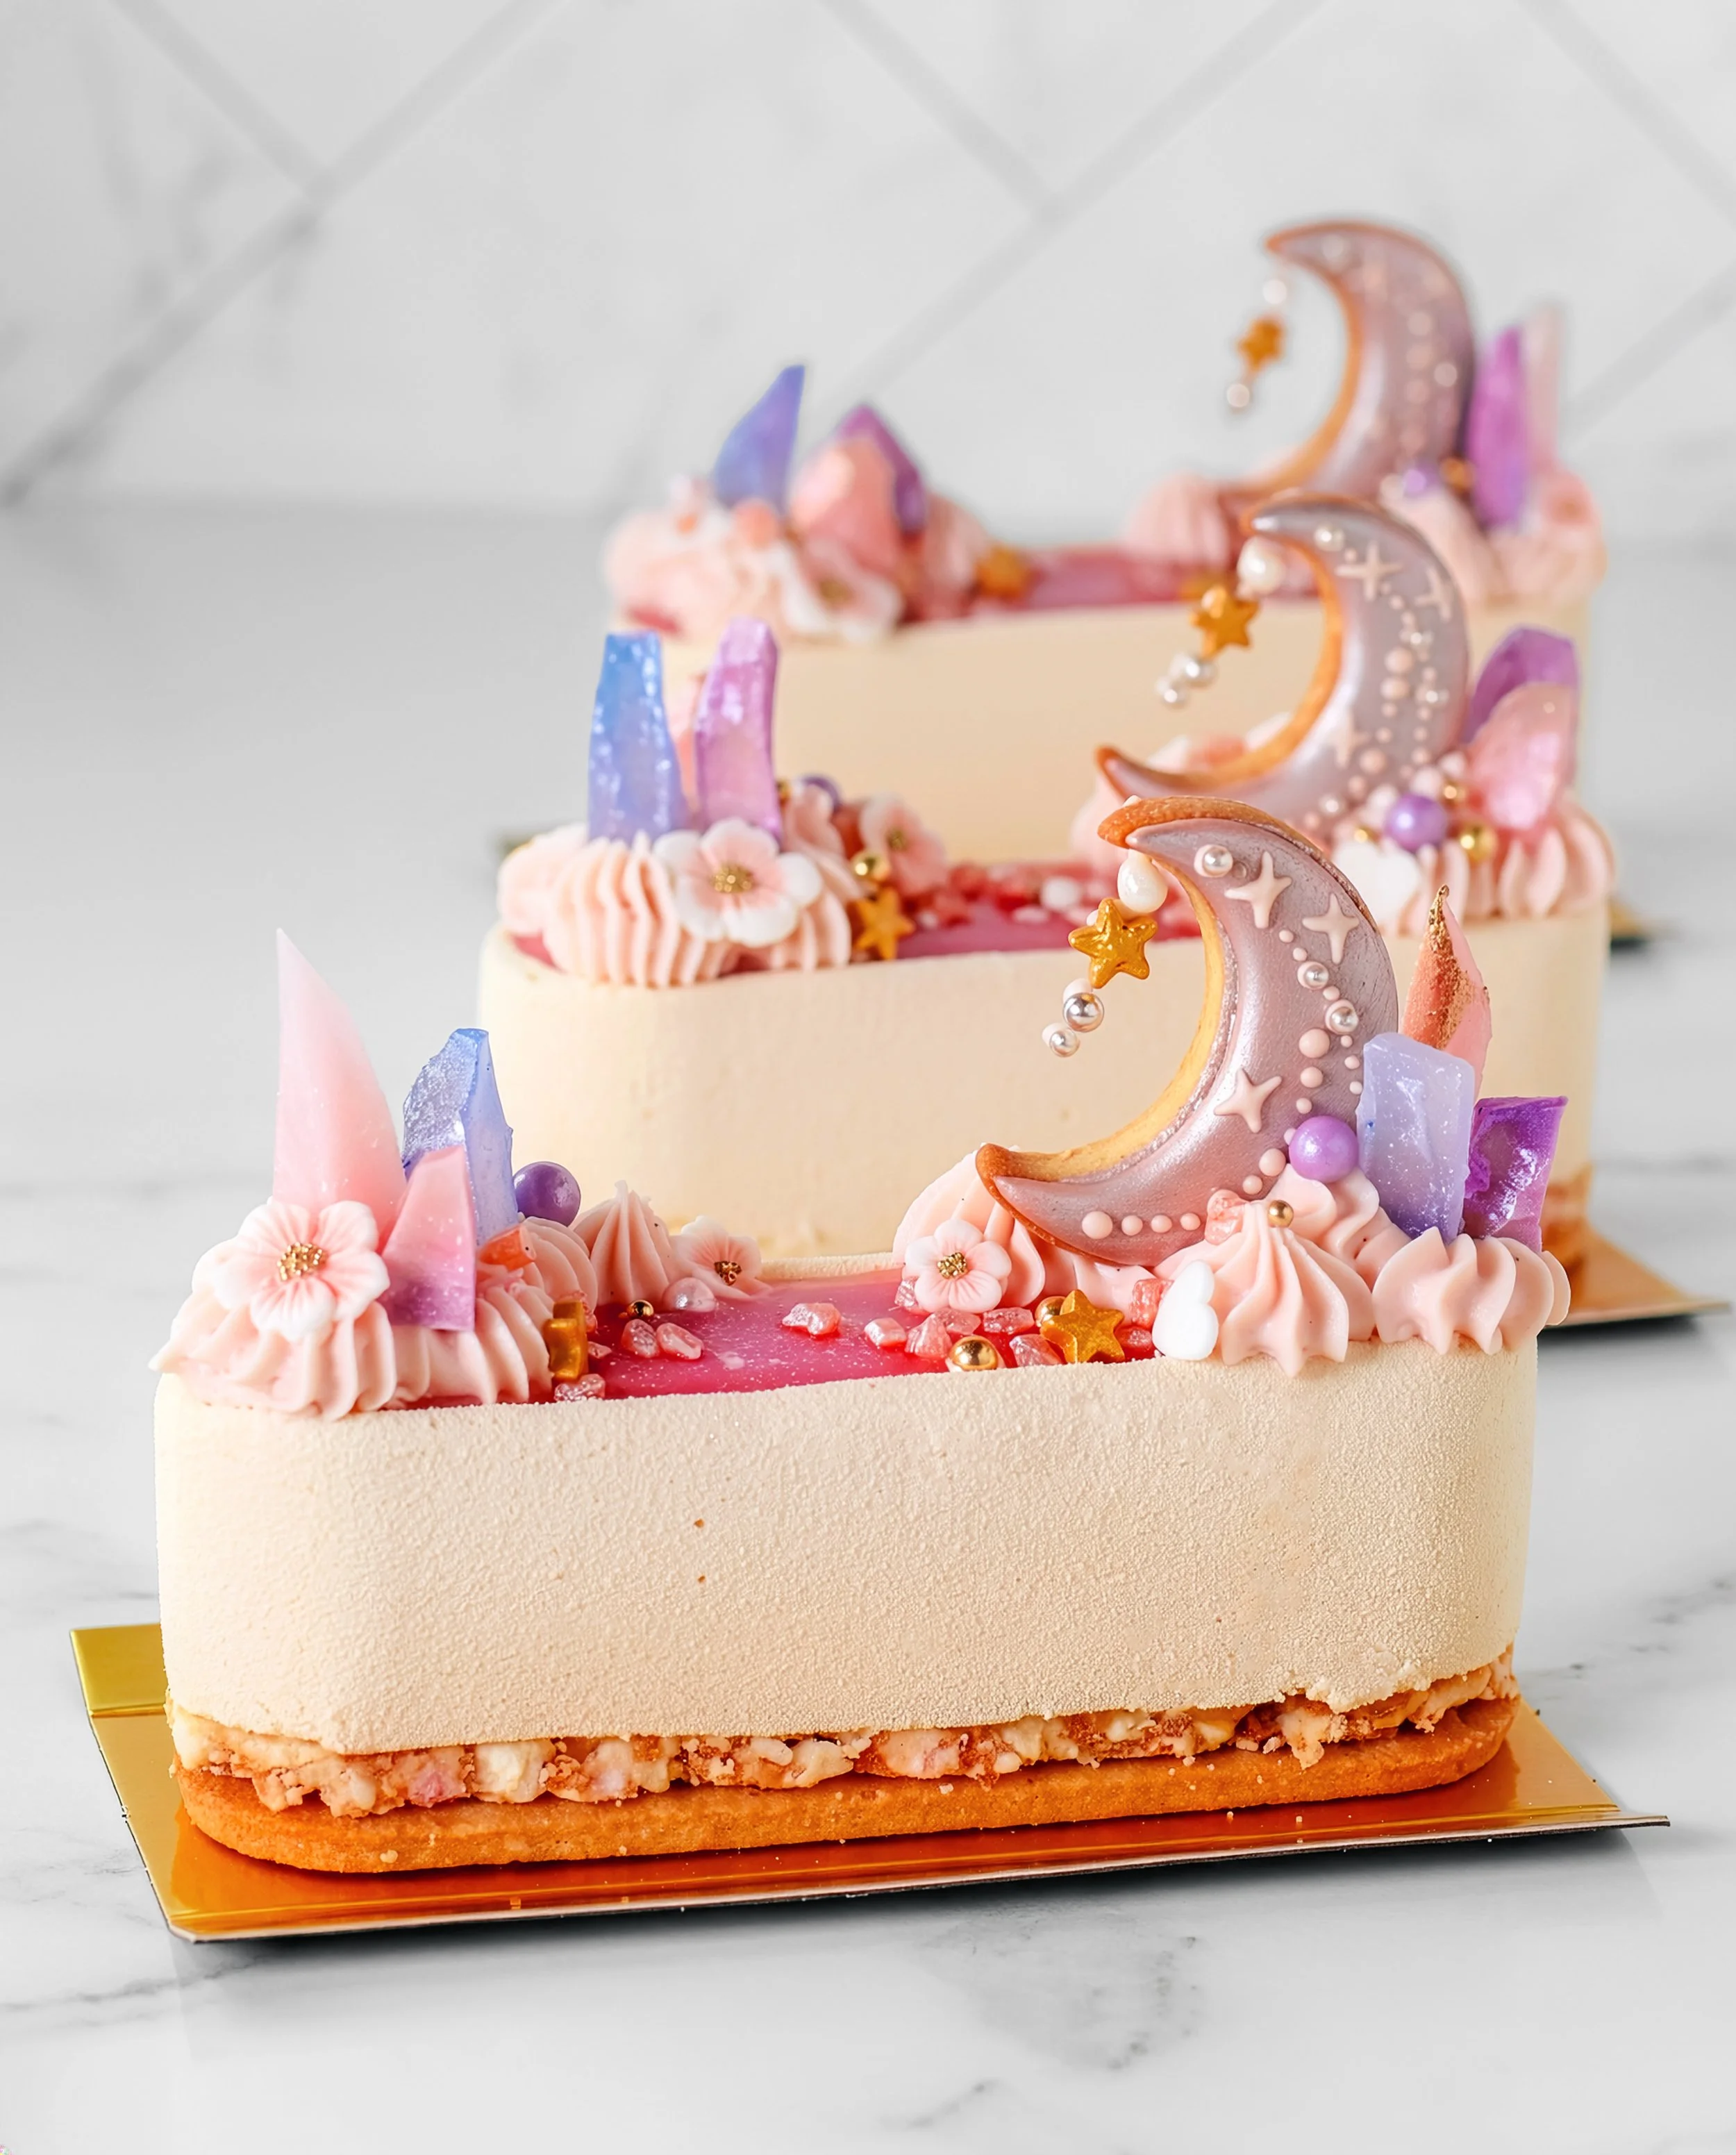
Moon Prism Cheesecake Bars
Sailor Moon-inspired cheesecake entremets with peach-jasmine mousse, crystal gelée, and all the Silver Millennium magic I could fit onto one small dessert.
If the Silver Millennium had a pastry pop-up, I’m pretty sure the menu would involve pearly cheesecake, edible crystals, and at least one dramatic crescent moon.
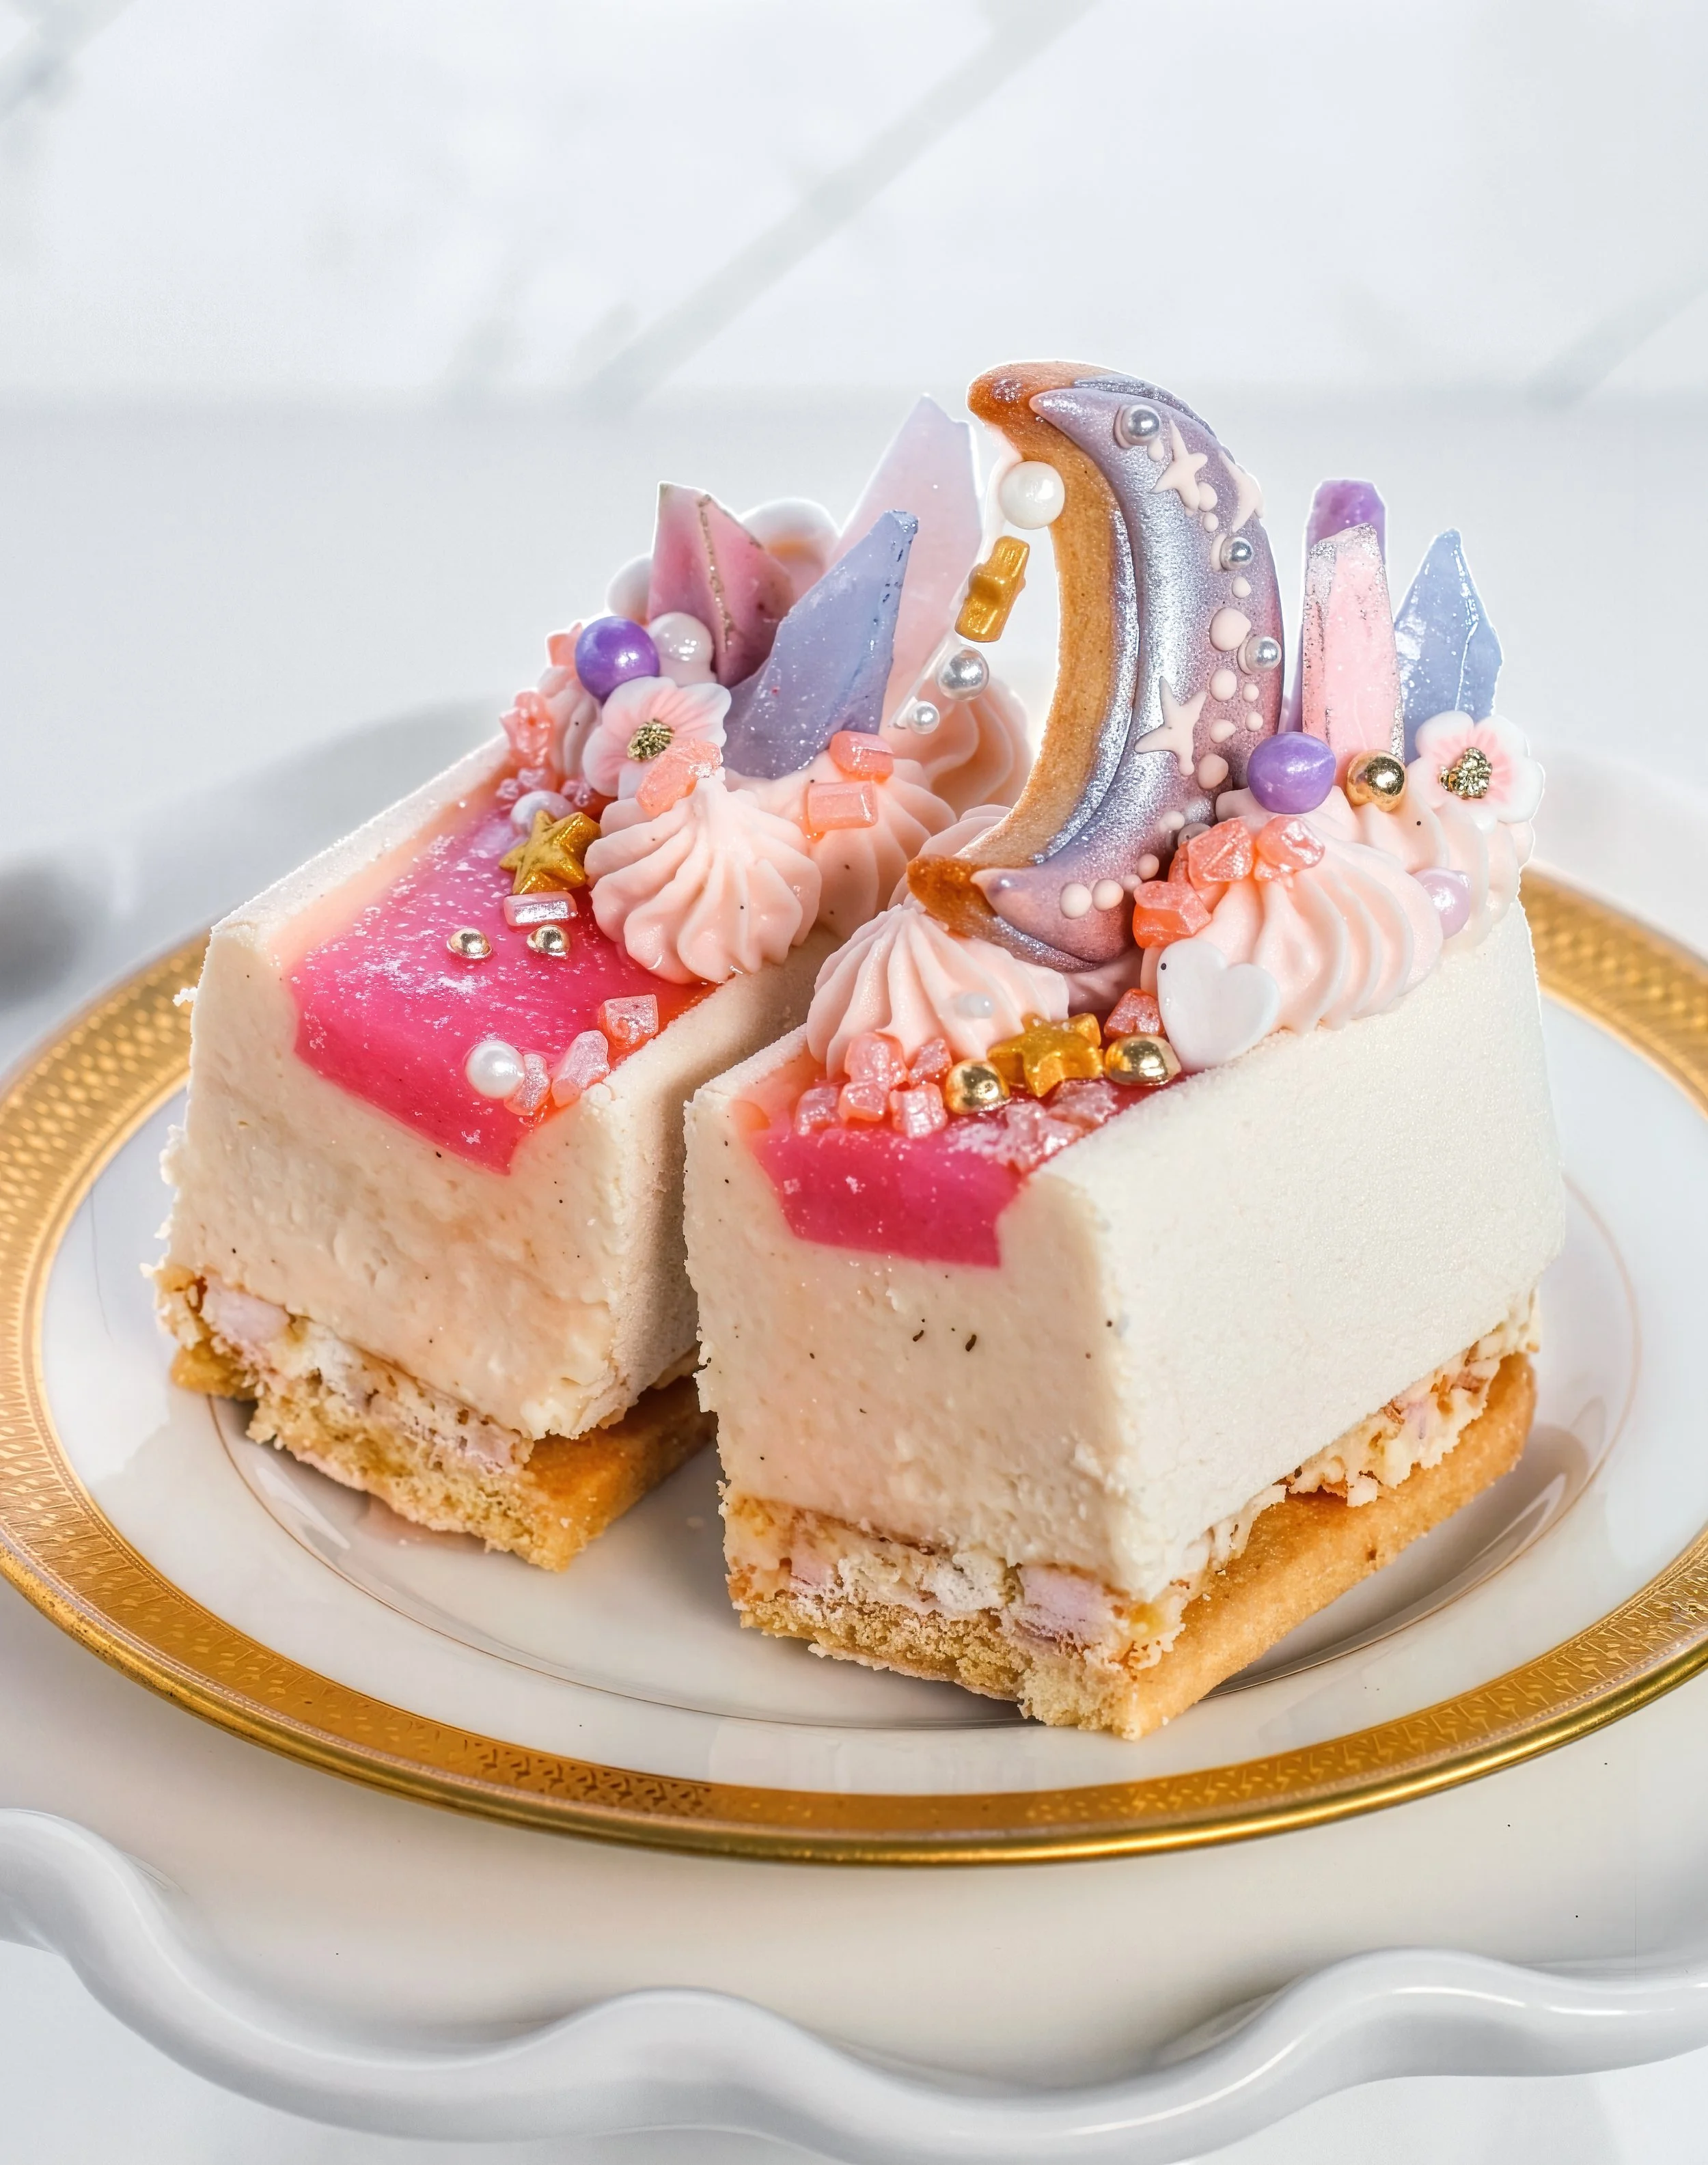
For this recipe, I imagined a dessert inspired by Sailor Moon’s lunar kingdom: soft, pale, sparkly, a little regal, and very much ready for its close-up. These Moon Prism Cheesecake Bars are made with peach-jasmine cheesecake mousse, lychee-yuzu crystal gelée, almond-peach mooncrunch crust, vanilla cheesecake clouds, and crescent moon cookie toppers.
They’re creamy, crisp, floral, fruity, and dressed up with moonstone shimmer, tiny crystals, and just enough transformation-sequence energy.
What are Moon Prism Cheesecake Bars?
These are individual frozen cheesecake mousse entremets inspired by the Silver Millennium from Sailor Moon. They are designed to feel like a tiny lunar palace in pastry form: pale peach, pearl-white, softly floral, crystal-bright, and finished with crescent moons.
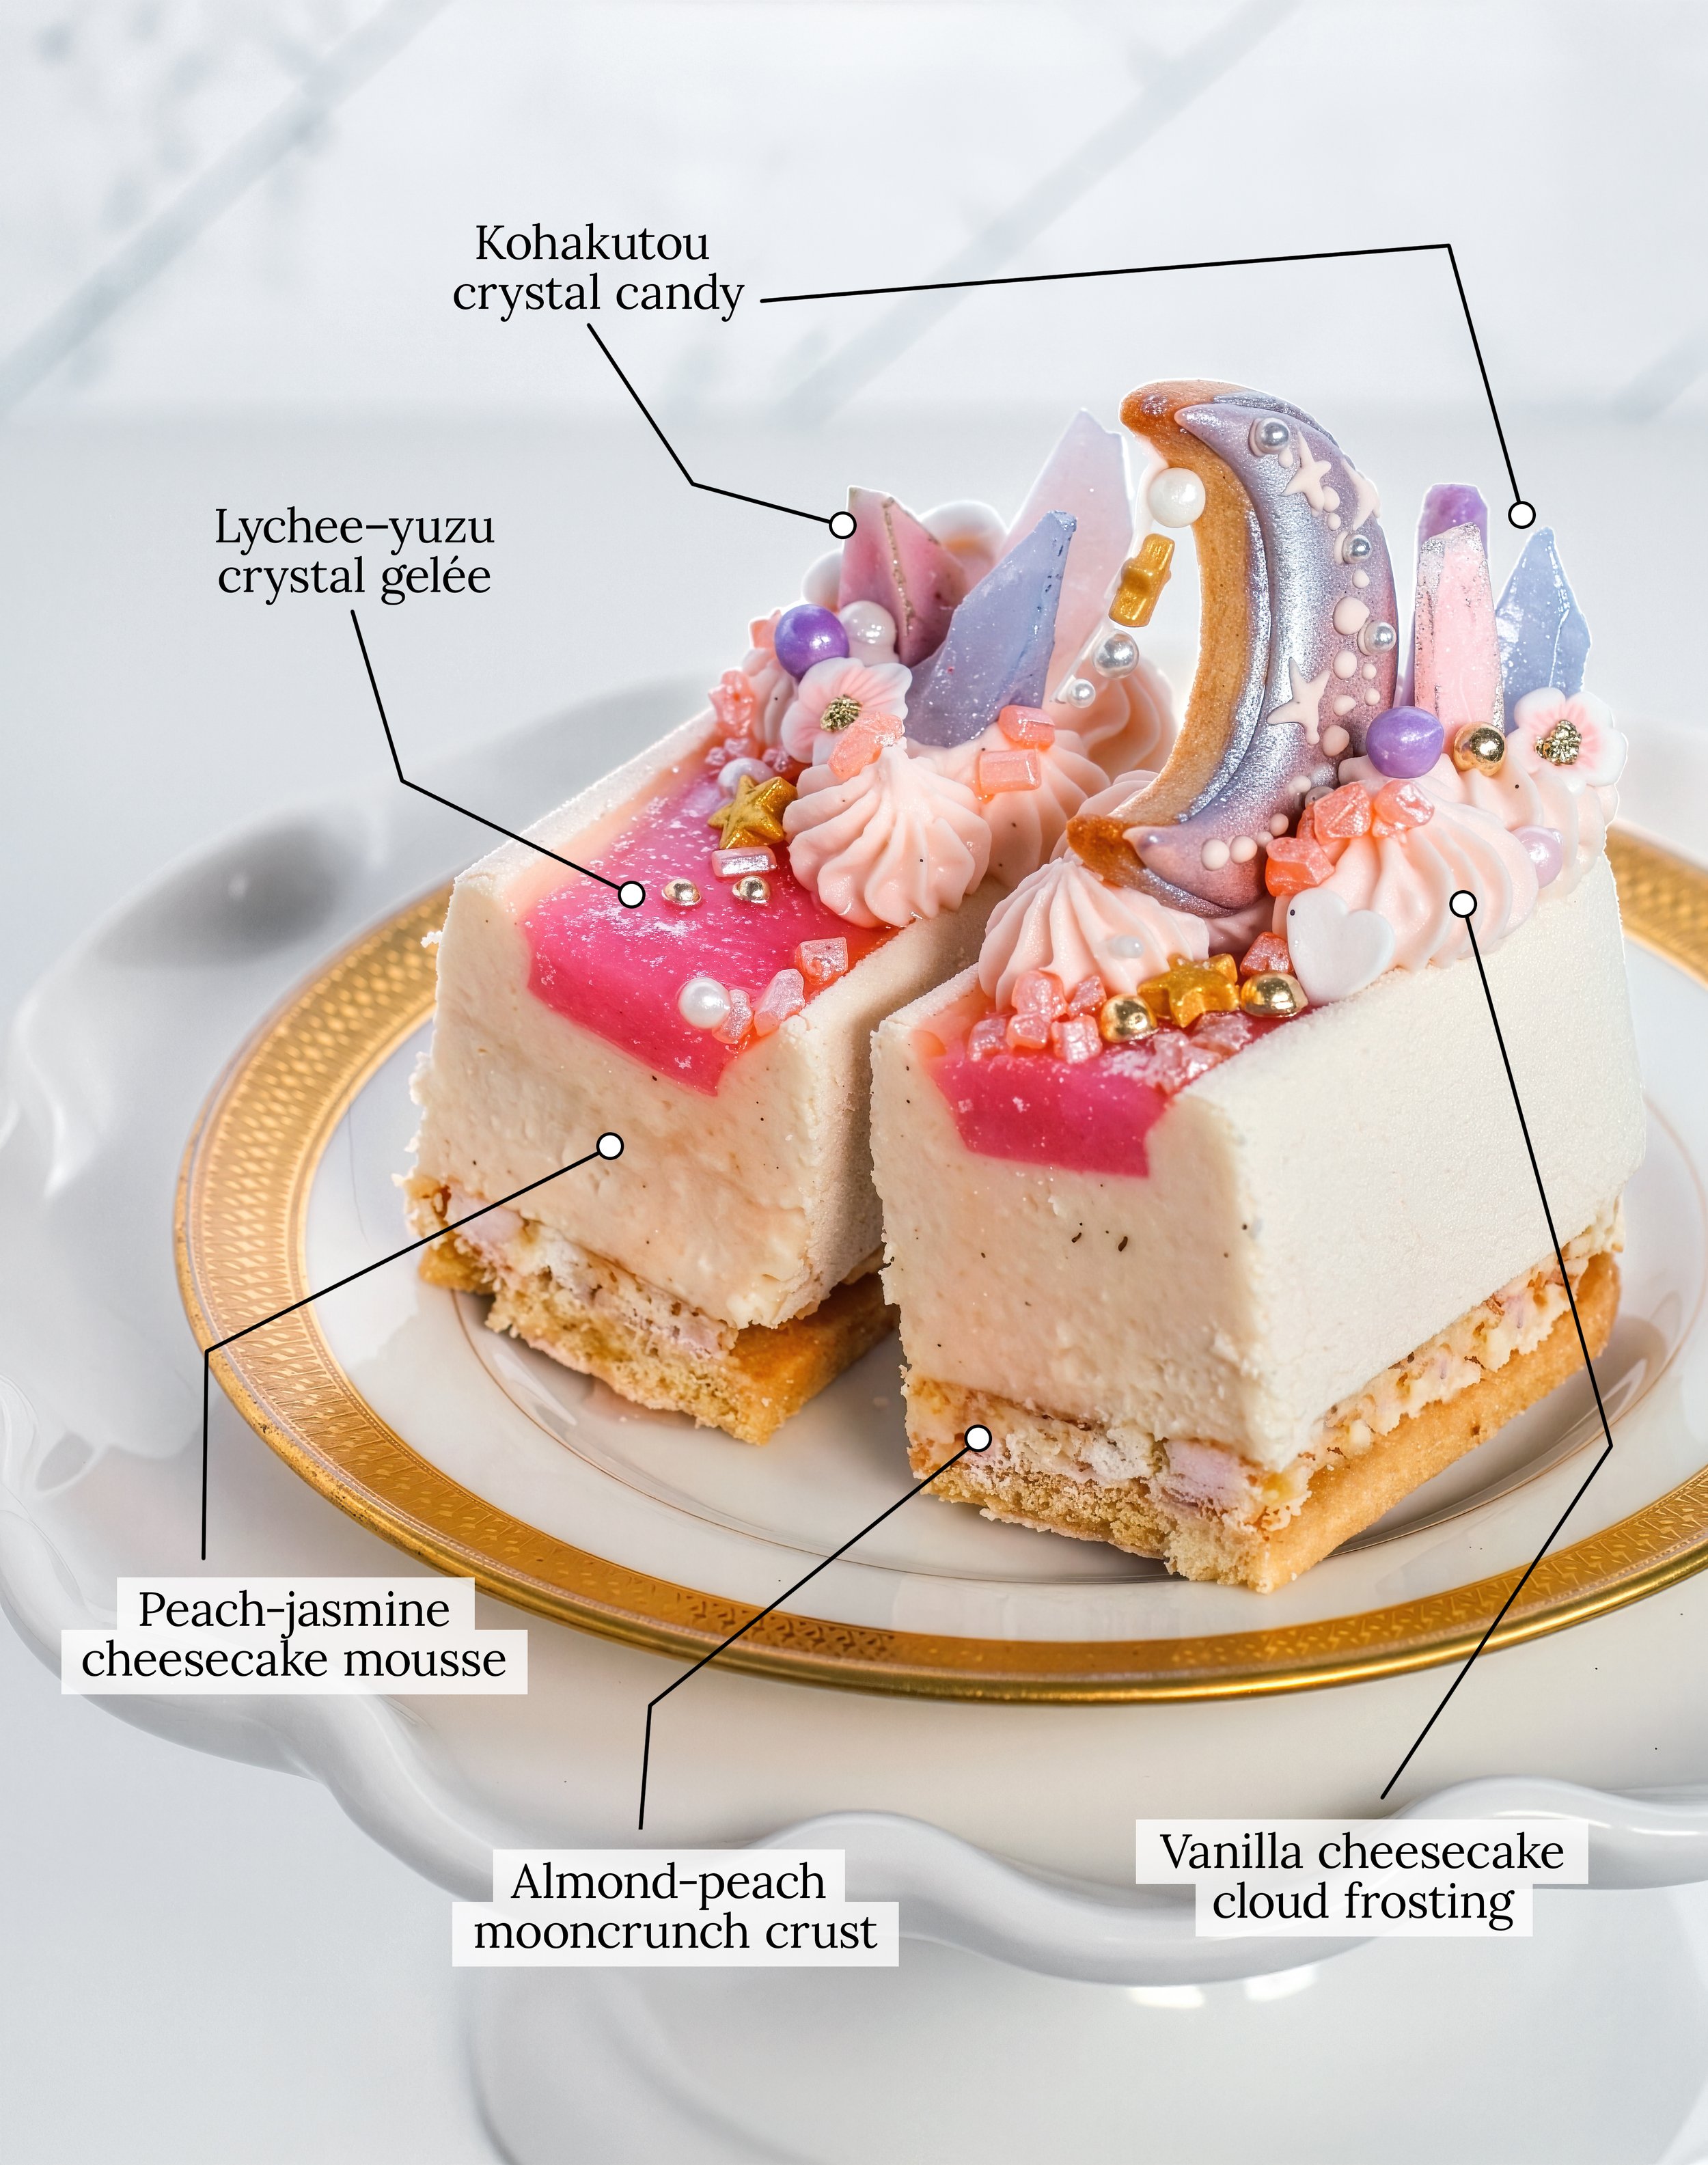
Each bar has five main parts:
Peach-jasmine cheesecake mousse
Lychee-yuzu crystal gelée
Almond-peach mooncrunch crust
Vanilla cheesecake cloud frosting
Decorations: crescent moon cookie toppers, kohakutou crystals & sprinkles
Prefer a printer-friendly version? Use the download link below.
Recipe Overview
Yield: 12 cheesecake bar entremets, with a small production buffer
Mold: Two 6-cavity 3D ellipse silicone molds, approximately 100 ml / 1/2 cup per cavity
Best enjoyed: Within 24 hours of final decoration
Storage: Box and refrigerate until serving
Components
Optional peach kohakutou crystals
Crescent moon cookies
Almond-peach mooncrunch crust
Peach-jasmine cheesecake mousse
Vanilla cheesecake cloud frosting
Pearl-white velvet coating
Lychee-yuzu crystal gelée
Equipment
Two 6-cavity 3D ellipse silicone molds, approximately 100 ml / 1/2 cup per cavity
Digital scale (micro-scale recommended as well)
Thermometer
Immersion blender
Stand mixer or hand mixer
Piping bags
Open star or French star piping tip
Offset spatula
Parchment paper or acetate
Crescent moon cookie cutter (or circle cutter)
Cutter or template for the crust bases
Spray gun or airbrush for velvet coating
Suggested Production Schedule
Optional Prep: 2 to 4 Days Before Assembly
Make the optional peach kohakutou crystals, if using. They need time to dry uncovered so the exterior can form a delicate crunchy shell.
Day 1: Cookies, Crust, Mousse, and Frosting Base
Make the crescent moon cookies.
Make the almond-peach mooncrunch crust, cut the bases, and store them cold and dry.
Make the peach-jasmine cheesecake mousse, pipe it into the molds, cover well, and freeze overnight.
Make the vanilla cheesecake frosting base and refrigerate overnight.
Day 2: Finish and Decorate
Keep the cheesecake bars wrapped and frozen until ready to finish.
Unmold and velvet-coat the frozen mousse bars.
Place each velvet-coated bar on a mooncrunch crust base.
Make or reheat the lychee-yuzu gelée and fill the top channels.
Whip and pipe the vanilla cheesecake cloud frosting.
Add crescent cookies, pearls, stars, and optional kohakutou crystals.
Box and refrigerate until serving.
Optional Day 3: Serve
For the freshest texture, serve within 24 hours of final decoration. The bars can hold up to 48 hours refrigerated if boxed and protected, but the crust, frosting ridges, and crystal garnishes are best earlier.
Optional Peach Kohakutou Crystals

Kohakutou crystals are optional, but they’re beautiful here. They add a tiny edible crystal moment with a crunchy exterior and chewy center.
I used Sugar Geek Show’s kohakutou recipe. For these bars, a 1/2 batch is more than enough.
Flavor the kohakutou lightly with LorAnn Peach Super Strength Flavoring. Color the mixture softly with pale blush, champagne, peach, or lilac. Once set, cut into tiny irregular crystals and dry uncovered until the exterior crust forms.
Component 1: Crescent Moon Cookies

These crescent moon cookies are the decorative toppers for the bars. I used a crisp almond sucrée dough because it bakes cleanly, holds its shape well, and gives the finished dessert a little cookie snap.
The decoration can be as simple or detailed as you like. A plain pearl-dusted crescent, a lightly painted cookie, or a more detailed piped design will all work here. The most important part is the shape and structure: the cookies should be rolled thin, fully baked, and completely cool.
I’ll share more of my detailed crescent decorating process on my socials (@inspiredtotaste), but the recipe below will give you the cookie base and assembly method you need for the finished entremets.
Ingredients
120 g unsalted butter, cool room temperature
75 g powdered sugar
2 g fine sea salt
4 g vanilla bean paste or vanilla extract
45 g almond flour
40 g whole egg, room temperature
210 g cake flour or pastry flour
Method
In the bowl of a stand mixer fitted with the paddle attachment, cream the butter, powdered sugar, salt, and vanilla just until smooth. Do not whip.
Mix in the almond flour.
Add the egg gradually and mix until emulsified.
Add the flour and mix only until the dough comes together.
Flatten the dough into a disc, wrap well, and chill for at least 2 hours, preferably overnight.
Roll the chilled dough between sheets of parchment to about 3 mm thick.
Cut crescent moons, then chill or freeze until firm before baking.
Bake at 325°F / 165°C until set and pale golden, about 10 to 14 minutes, depending on size.
Cool completely before decorating or assembling.
Component 2: Almond-Peach Mooncrunch Crust
This is the crisp crust for the bars. It’s almond-caramel forward, lightly salty, and studded with tiny peach sparks from freeze-dried fruit.
Use store-bought almond praliné paste here if possible. If you prefer to make your own, I recommend using a small-batch almond praliné recipe separately rather than folding that extra project into this already multi-component dessert.
Ingredients
160 g white chocolate
26 g cocoa butter
70 g almond praliné paste
65 g feuilletine
20 g crispy puffed rice, lightly crushed
12 to 16 g freeze-dried diced peaches (I used these)
6 to 8 g toasted milk powder, optional
4 g fine sea salt
Approximate yield: about 360 g
Target thickness: 4 to 5 mm
Cutting target: 14 to 16 bases for 12 finished bars. Extras = snacks
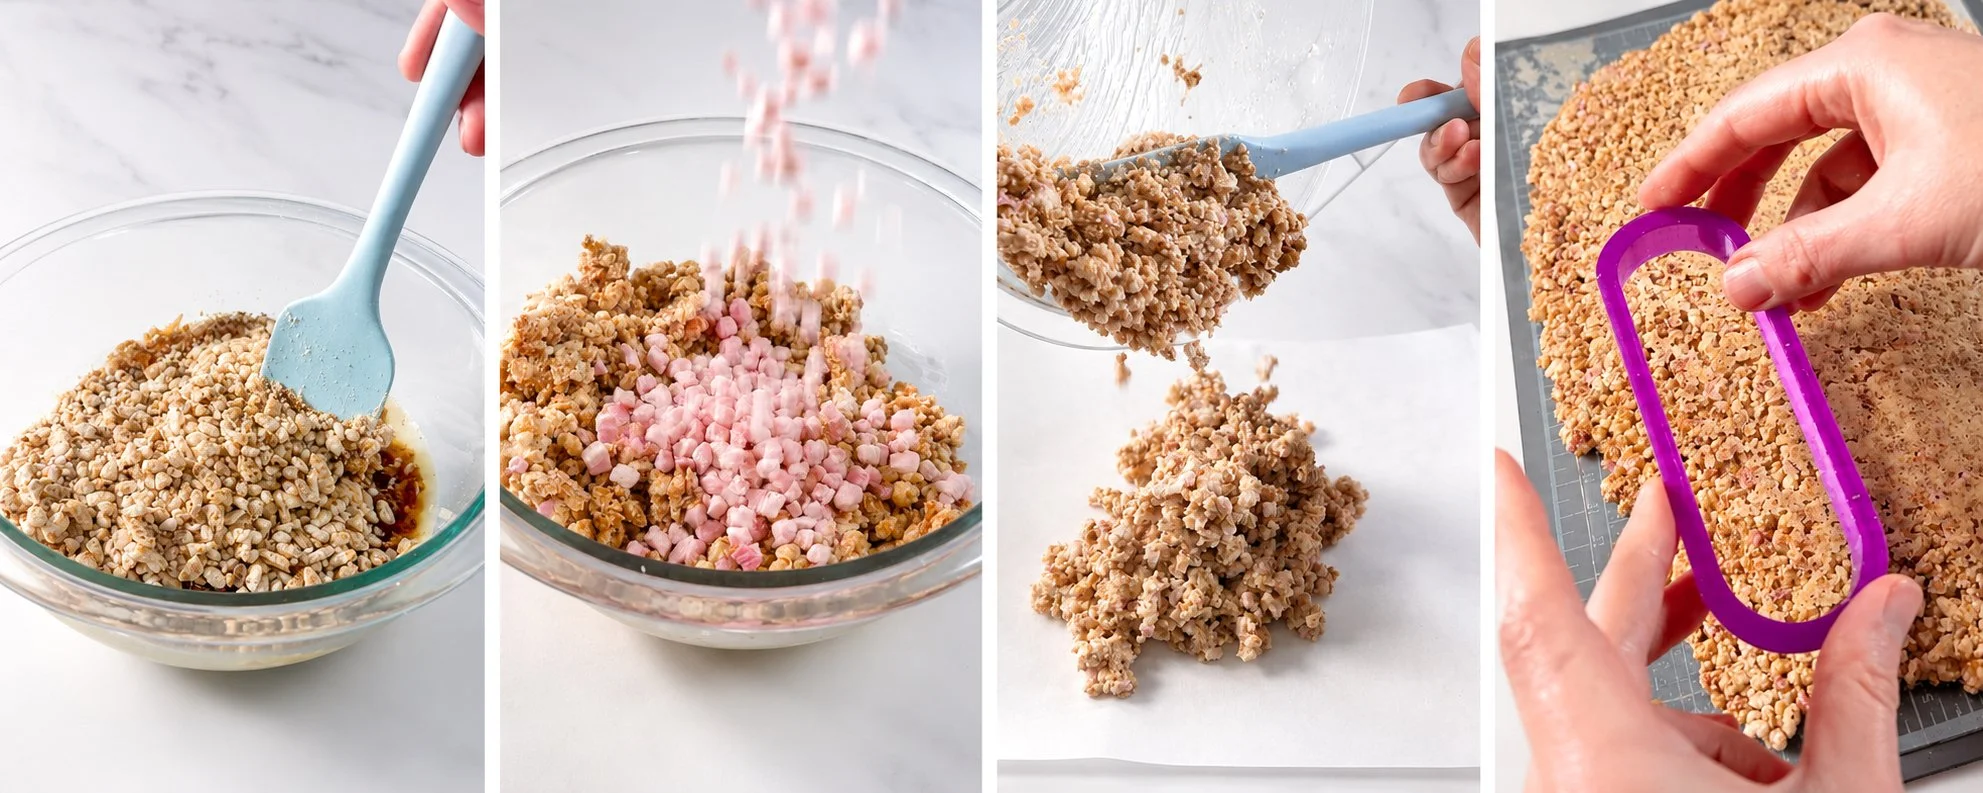
Method
Melt the white chocolate and cocoa butter together until smooth.
If the almond praliné paste is thick, warm it gently until loosened.
Stir the almond praliné paste into the melted white chocolate and cocoa butter until smooth.
Fold in the feuilletine, puffed rice, freeze-dried peach, optional toasted milk powder, and salt. Mix until evenly coated.
Spread between sheets of parchment or acetate using 4 to 5 mm guides.
Chill until firm but still cuttable, about 20 to 30 minutes in the refrigerator or 5 to 10 minutes in the freezer.
Peel off the top parchment or acetate.
Cut bases using the same cutter or template footprint as the molded bars. If using a metal cutter, warm it slightly, dry it completely, then cut.
Store the cut bases cold and dry until assembly.
Notes
If the mixture seems too dry to bind, add more melted cocoa butter, 3 to 5 g at a time.
If the freeze-dried peach pieces are large, crush them lightly. Large pieces can create weak spots when cutting.
Component 3: Peach-Jasmine Cheesecake Mousse
This mousse is designed for a molded, decorated dessert. It’s firmer than a plated mousse, but should still thaw creamy.
The peach should taste clear but not candy-like. The jasmine should feel like a soft floral finish, not a strong tea flavor.
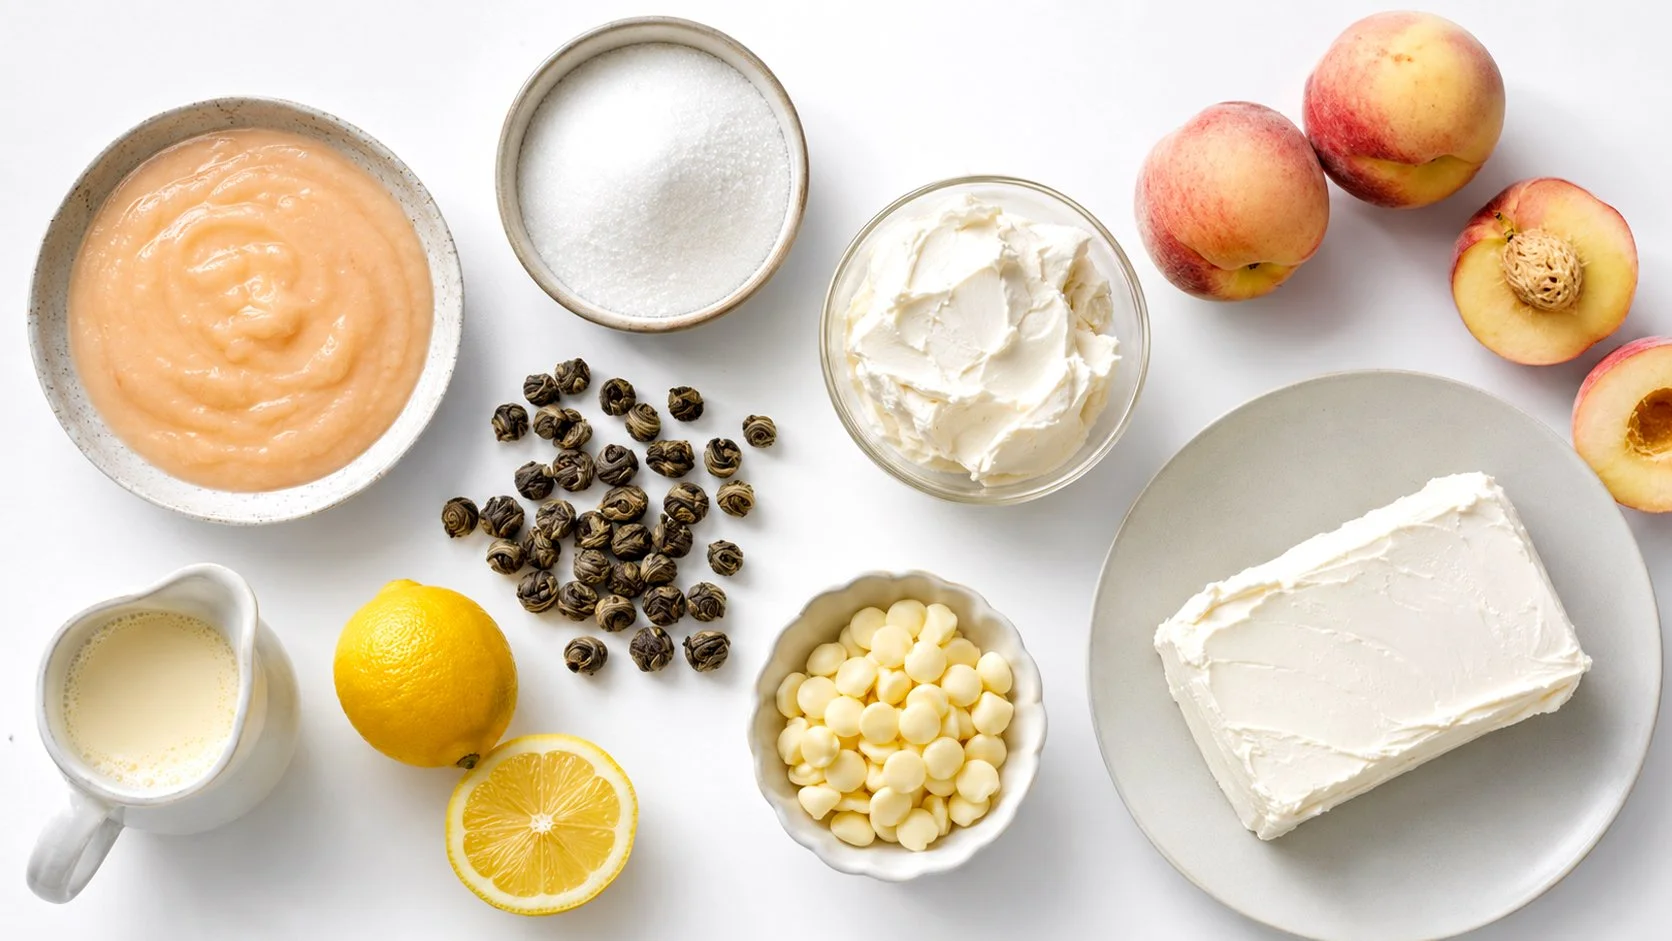
Ingredients
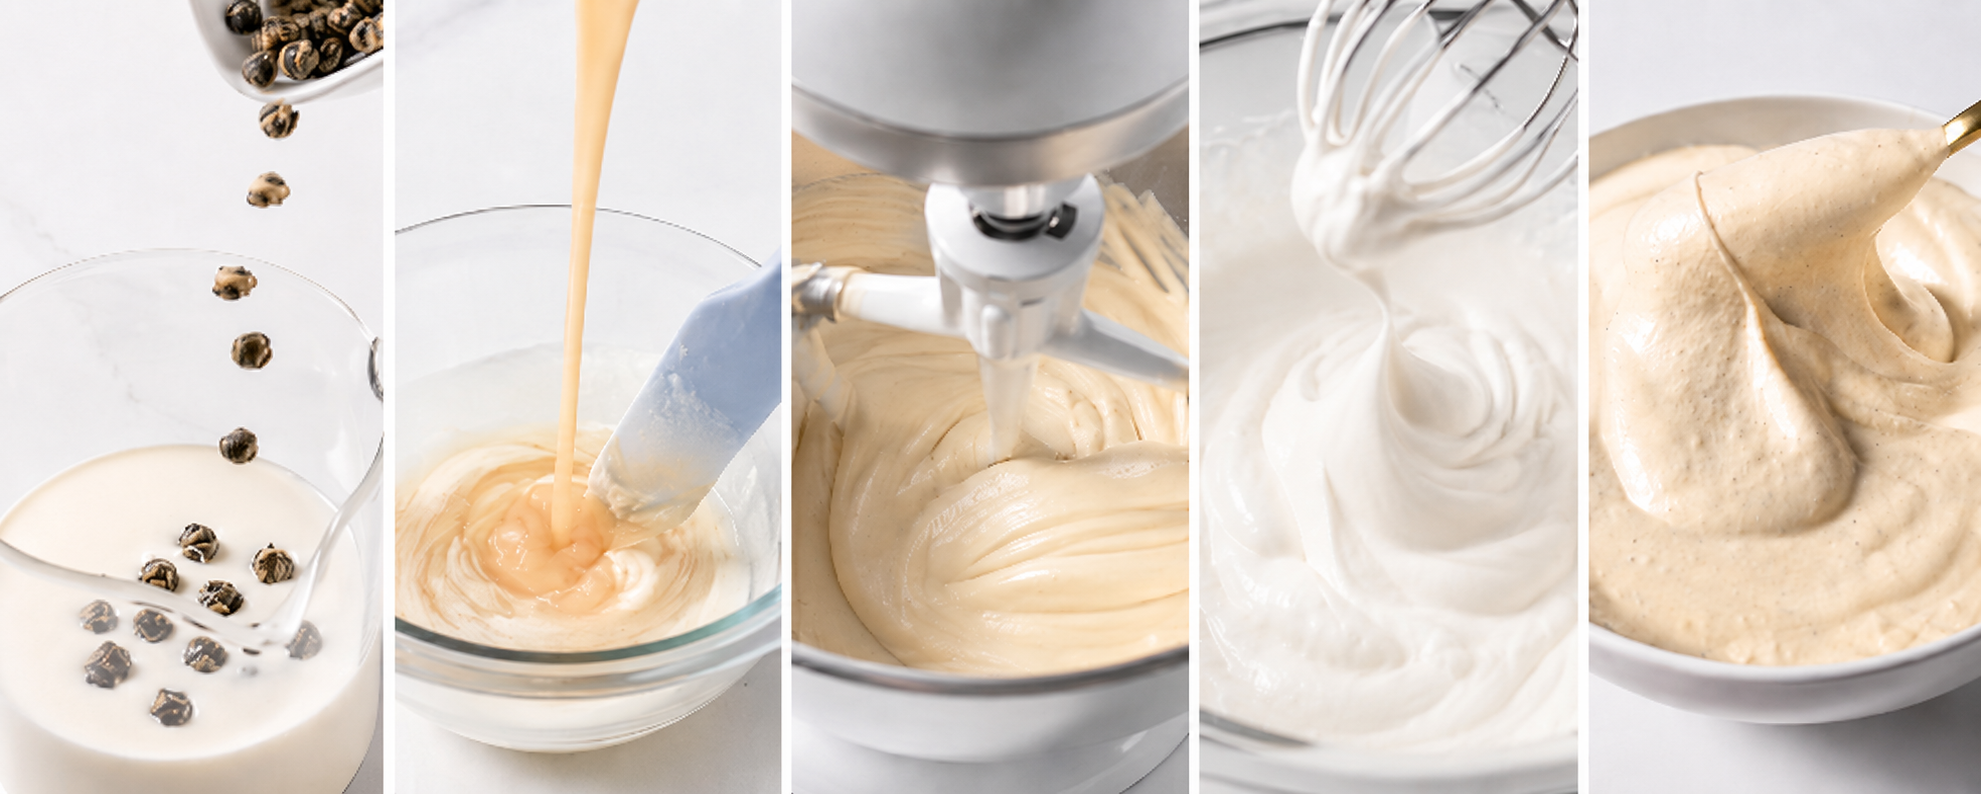
Jasmine Cream Infusion
350 g cold heavy cream
12 to 15 g jasmine dragon pearls
You will use 320 g strained infused cream in the mousse.
Cheesecake Base
375 g full-fat cream cheese, softened
125 g mascarpone
115 g granulated sugar
35 g powdered sugar
285 g white peach purée, strained
95 g white chocolate, melted
14 g yuzu juice or lemon juice
8 g vanilla bean paste
2 g fine sea salt
1/4 tsp to just under 1/2 tsp LorAnn Peach Super Strength Flavoring, to taste
11 g powdered gelatin, 200 bloom
55 g cold water (for blooming gelatin)
Yield: about 1,430 g mousse
Method
Combine 350 g cold heavy cream with the jasmine dragon pearls. Cover and refrigerate for 14 to 16 hours.
Strain gently. Do not crush or aggressively squeeze the pearls. Weigh 320 g infused cream for the mousse. If needed, top up with plain heavy cream.
Bloom the gelatin in the cold water for 10 minutes.
Warm about 100 g of the peach purée with the granulated sugar to 55 to 60°C / 130 to 140°F.
Remove from heat and dissolve the bloomed gelatin into the warm peach-sugar mixture.
Pour the warm peach mixture over the melted white chocolate in 2 to 3 additions, blending after each addition until smooth and glossy.
Add the remaining peach purée, yuzu or lemon juice, vanilla, salt, and peach flavoring.
Taste the base. It should taste slightly louder than ideal, because cold temperature, dairy fat, freezing, and aeration will soften the peach flavor.
In a mixer bowl fitted with the paddle attachment, mix the cream cheese, mascarpone, and powdered sugar until completely smooth.
Stream in the peach-white chocolate mixture on low speed.
Scrape the bowl well, then immersion blend until silky.
Cool the base to 30 to 35°C / 86 to 95°F.
Whip the 320 g jasmine-infused cream to soft peaks.
Fold one-third of the whipped cream into the cheesecake base, then gently fold in the rest.
Pipe immediately into the silicone molds. Press the mousse into the corners and tap the molds gently to release air bubbles.
Cover the molds well and freeze until completely solid, preferably overnight.
Component 4: Vanilla Cheesecake Cloud Frosting
This cheesecake frosting is designed to pipe cleanly and support the crescent cookies and small garnishes.
Ingredients
90 g heavy cream #1
100 g white chocolate, finely chopped
1.6 g powdered gelatin, 200 bloom
8 g cold water (for blooming gelatin)
73 g cream cheese, softened
45 to 50 g mascarpone
60 to 65 g cold heavy cream #2
5 to 8 g powdered sugar
3 g vanilla bean paste
Tiny pinch fine sea salt
Yield: about 385 to 390 g
Method
Bloom the gelatin in the cold water for 10 minutes.
Warm heavy cream #1 until steaming, but not boiling.
Stir the bloomed gelatin into the warm cream until fully dissolved.
Pour the warm cream over the white chocolate. Let sit for 1 minute, then whisk or immersion blend until glossy and smooth.
In a separate bowl, smooth the cream cheese, mascarpone, powdered sugar, vanilla, and salt.
Gradually blend in the warm ganache.
Add cold heavy cream #2.
Immersion blend briefly until silky.
Cover directly with plastic wrap and refrigerate overnight. Six hours is the minimum, but overnight is more reliable.
When ready to decorate, whip on medium-low to medium speed until firm-medium peaks form. The frosting should show clean ridges and a standing peak, but should not look dry, grainy, or broken.
Notes
An open star or French star tip works well for the piped cloud clusters.
If you are working slowly or your kitchen is warm, divide the whipped frosting between two piping bags. Keep one bag refrigerated while piping with the other.
Component 5: Pearl-White Velvet Coating
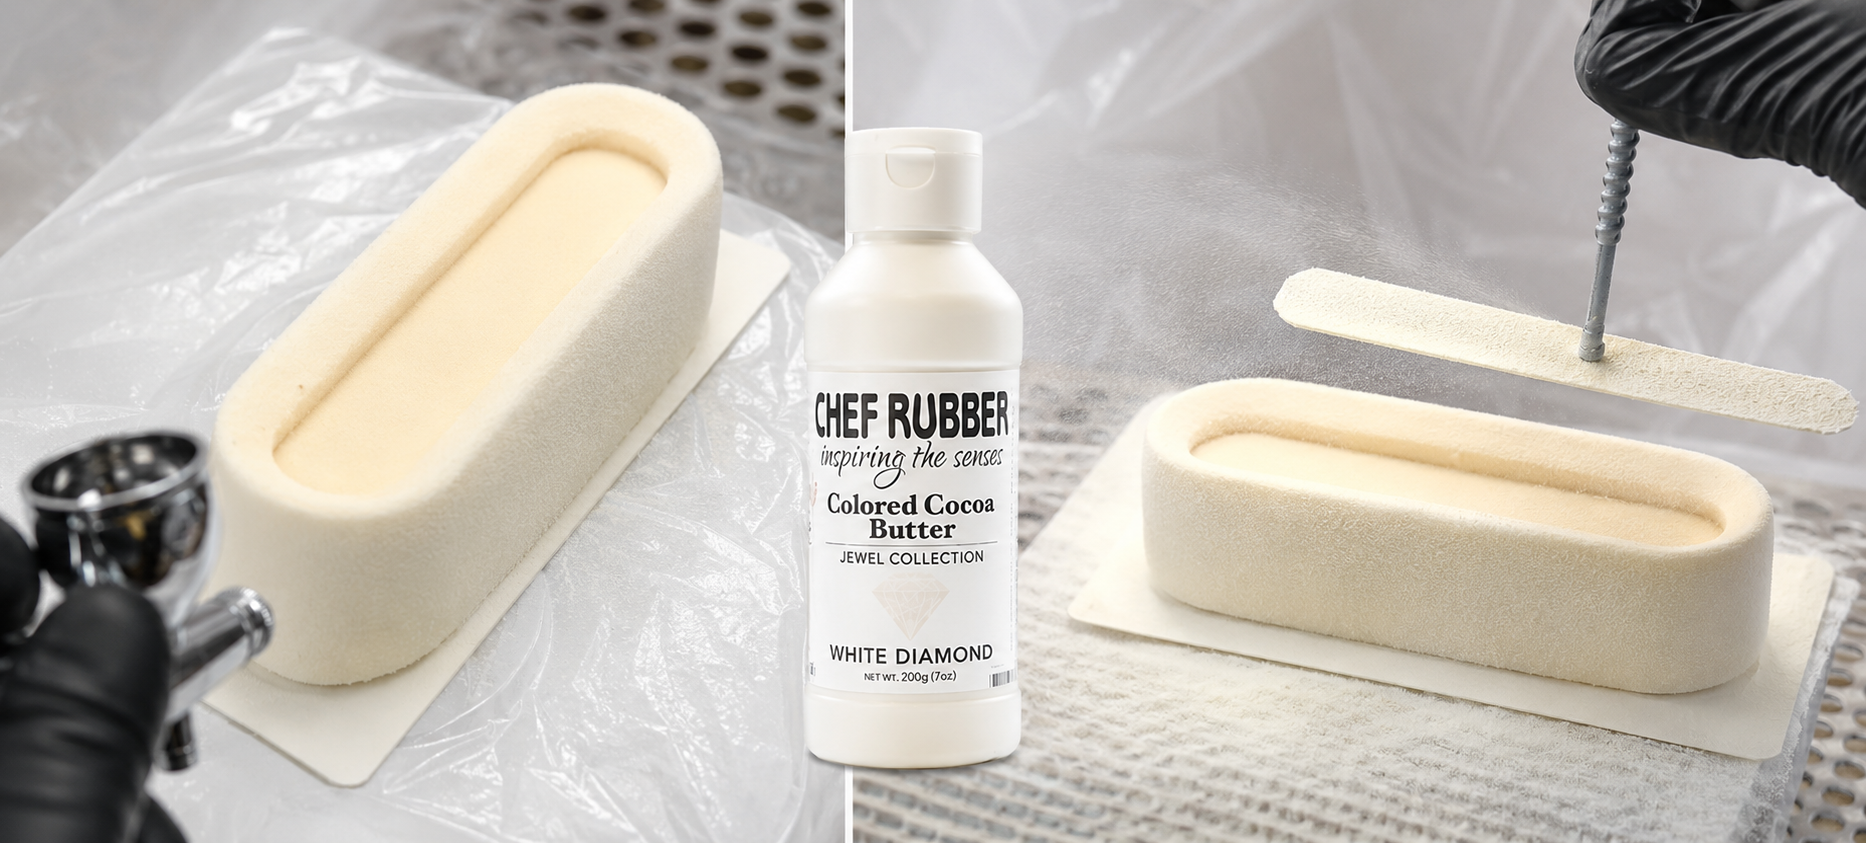
The velvet coating gives the bars their moonstone finish and adds a little exterior structure to the mousse.
This quantity may make more than you need, but very small spray batches can be difficult to use depending on your equipment.
Ingredients
75 g white chocolate
75 g cocoa butter (I used Chef Rubber White Diamond cocoa butter)
White oil-based color
Pearl luster dust, optional
Method
Melt the white chocolate and cocoa butter together.
Blend in the white color and optional pearl luster.
Strain into the spray gun.
Use at approximately 35 to 40°C / 95 to 104°F, or according to your sprayer’s behavior.
Spray the fully frozen bars in thin, even coats, building up the texture as desired.
Keep the top channel as clean as possible. Mask it if needed, or gently clear the channel before filling with gelée.
Component 6: Lychee-Yuzu Crystal Gelée
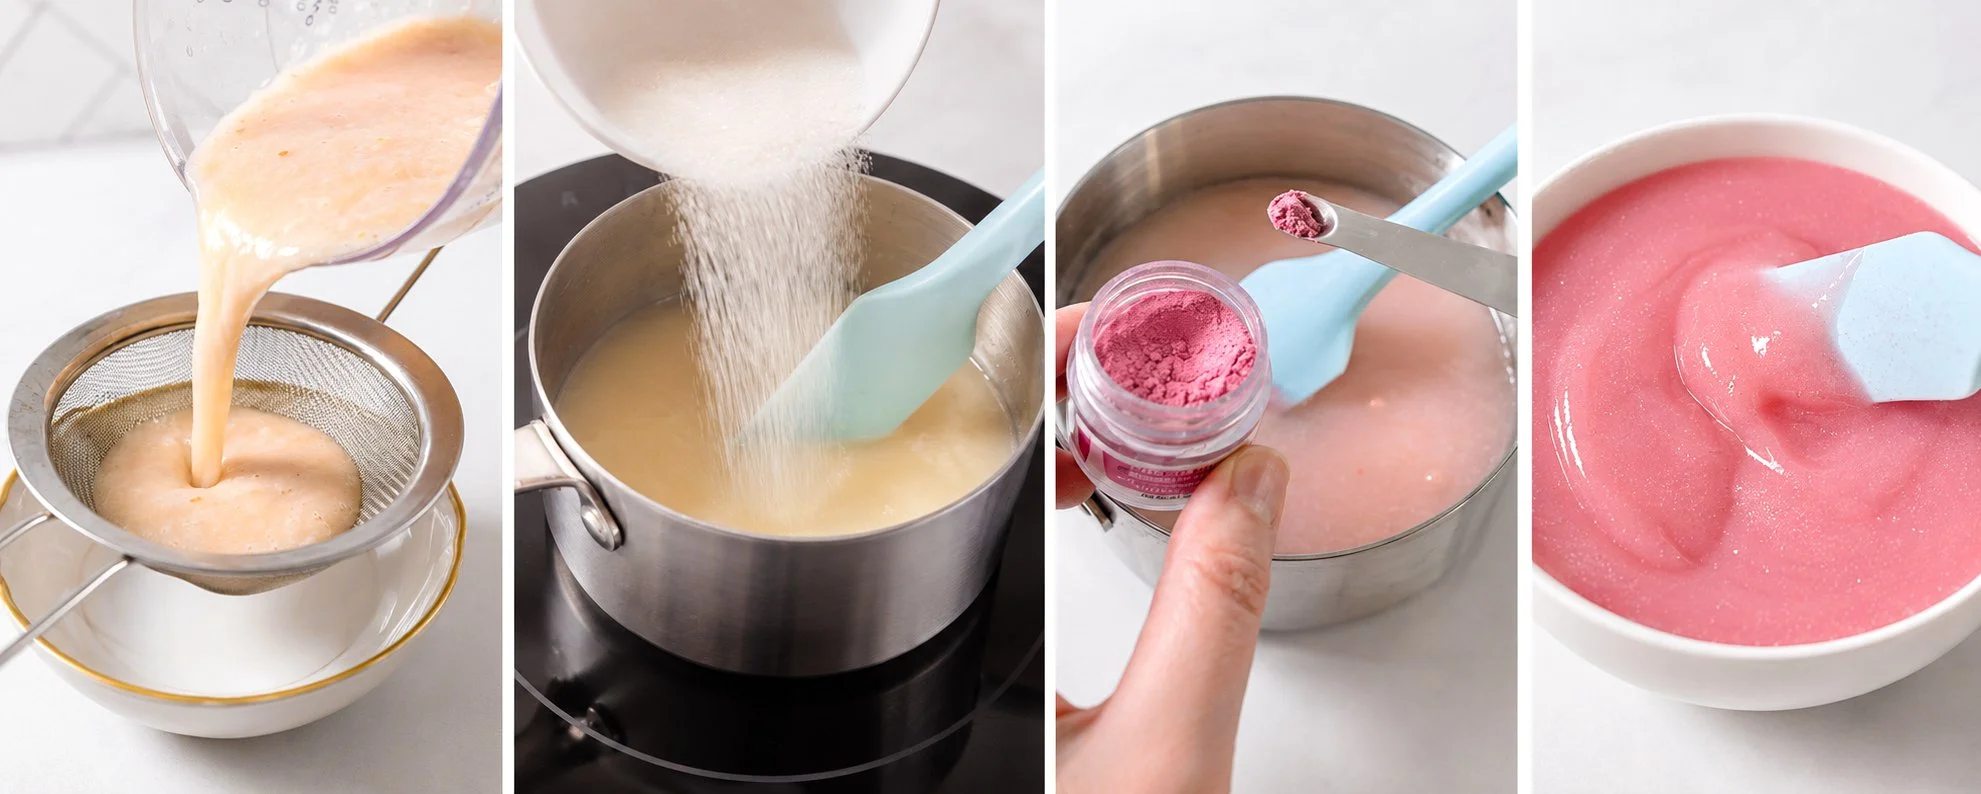
This is the glossy “crystal river” in the top channel. It should be tender, sliceable, and bright, with lychee first and yuzu sparkle second.
Ingredients
157 g strained lychee purée or lychee juice
34 g granulated sugar
14 g glucose syrup or light corn syrup
3.2 g pectin NH
24 g yuzu juice
2 g lemon juice, plus up to 2 g more to taste
0.3 g fine sea salt
Tiny pinch pearl shimmer or silver luster, optional
Micro-dot blush gel color, optional
Yield: about 220 to 230 g
Use: 8 to 12 g per bar, depending on channel depth
Method
Whisk the sugar and pectin NH together very thoroughly.
Combine the lychee purée or juice, glucose, and salt in a saucepan.
Warm to 40 to 45°C / 104 to 113°F.
Rain in the sugar-pectin mixture while whisking constantly.
Bring to a true boil and boil for 45 to 60 seconds.
Remove from heat.
Let cool briefly to about 80 to 85°C / 176 to 185°F.
Whisk in the yuzu juice and lemon juice gradually.
Immersion blend briefly, keeping the blender head fully submerged to avoid bubbles.
Strain.
Add shimmer and color after straining, using a very light hand.
Cool to 38 to 42°C / 100 to 108°F before filling the frozen cheesecake channels.
Make-Ahead Note
Best texture: make the gelée fresh on the day of filling.
If made ahead, refrigerate until set. To reuse, warm the full batch to 65 to 75°C / 149 to 167°F until completely fluid, glossy, and unified. Blend, strain, and cool to 38 to 42°C / 100 to 108°F before filling.
Final Assembly
1. Prepare the Mooncrunch Crusts
Cut the almond-peach mooncrunch crust bases to match the bar footprint.
Store cool and dry until needed.
2. Unmold and Velvet-Coat the Mousse Bars
Keep the cheesecake bars wrapped and frozen until you are ready to finish them.
Unmold the bars while fully frozen, then velvet-coat immediately with the pearl-white velvet spray.
Keep the top channel as clean as possible for the gelée.
Return the bars to the freezer or refrigerator briefly to stabilize, if needed.
3. Place the Bars on the Crusts
Place each frozen, velvet-coated bar securely on a mooncrunch crust base.
As the bars soften slightly, they will naturally adhere to the crust. If you are worried about jostling during transport or handling, you can use a couple of tiny dots of melted white chocolate or cocoa butter as extra insurance.
4. Fill the Crystal Channel
Prepare fresh gelée, or fully remelt, blend, made-ahead gelée.
Cool to 38 to 42°C / 100 to 108°F.
Pipe or pour into the channel.
Refrigerate until set.
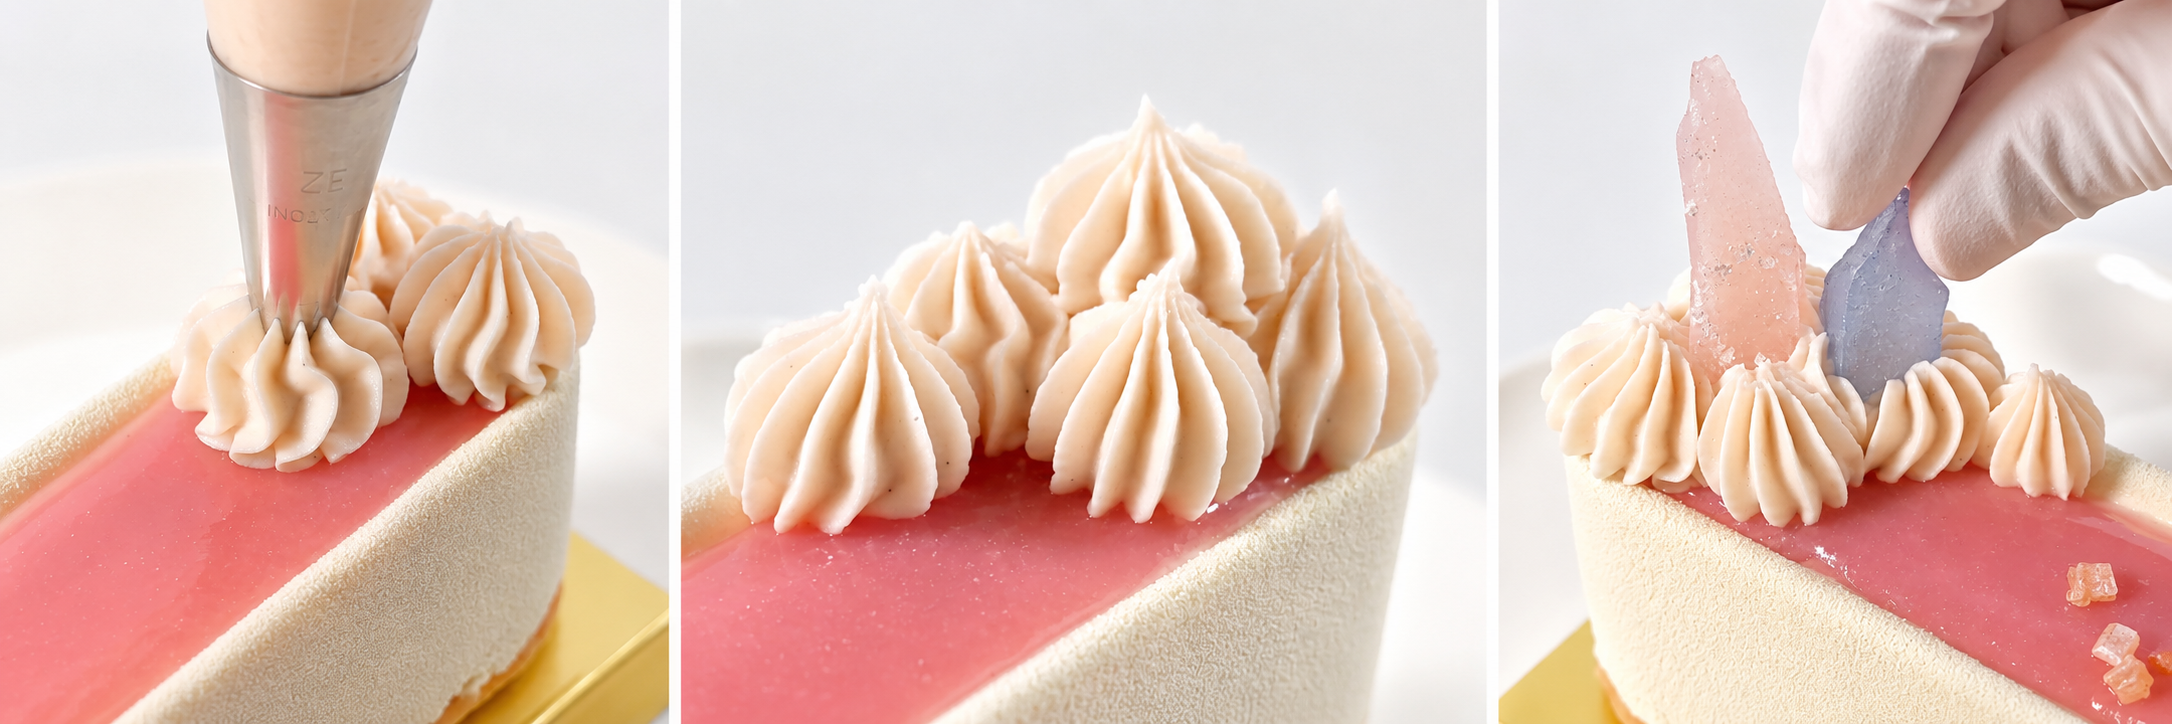
5. Pipe the Vanilla Cheesecake Clouds
Whip the frosting to firm-medium peaks.
Transfer the frosting to piping bags fitted with an open star or French star tip. If working slowly or in a warm kitchen, divide the frosting between two bags and keep one refrigerated while you pipe with the other.
Pipe a wide cloud cluster near one end of each bar.
For better support, use a cluster rather than one tall, narrow mound. A good structure is one larger mound, two medium kisses, and two tiny support kisses.
6. Add the Crescent Cookies
Press each crescent into the fresh frosting, sinking the bottom edge about 3 to 5 mm into the cloud.
Pipe a tiny support kiss behind the crescent and a small kiss in front to help hold the cookie in place and disguise the anchor.
The frosting should provide enough support on its own, especially if the cookies are thin, fully baked, and added while the frosting is freshly piped.
7. Add Final Garnishes
Add pearls, stars, and kohakutou crystals last.
Keep the decoration elegant and readable. The channel should still feel like moonlit water, not sprinkle resin.
Storage and Serving
Box the finished bars and refrigerate until serving.
For the best texture, serve within 24 hours of final decoration. The bars can hold up to 48 hours refrigerated if boxed and protected, but the crust, frosting ridges, and crystal garnishes are freshest earlier.
Do not freeze after piping the frosting.
For the best eating texture, let the bars sit at room temperature for about 5 to 10 minutes before serving.
Troubleshooting
Peach flavor too faint
Use the peach flavoring intentionally. Add it to the peach-white chocolate base before folding in the whipped cream.
The base should taste slightly too peachy before folding, because cold temperature, fat, freezing, and aeration will soften the flavor.
Mooncrunch crust crumbles
Increase the cocoa butter by 3 to 5 g at a time.
Make sure all inclusions are fully coated before sheeting.
Cut while the slab is firm but not frozen-solid.
Frosting is too soft or loses definition
Keep the frosting, bowl, beaters, piping bags, and tip cold.
Whip to firm-medium peaks. The frosting should hold clean ridges and a standing peak without looking dry or broken.
If the frosting softens in the bag, refrigerate it for 10 to 15 minutes, then gently massage the bag before piping again.
Crescent cookie leans
Use a wider frosting base.
Press the crescent 3 to 5 mm into the freshly piped cloud.
Pipe small support kisses in front of and behind the cookie.
Thin, fully baked cookies will be easier to support than thicker or softer cookies.


Final Thoughts
Somewhere in the Silver Millennium, there is absolutely a dessert counter serving moonlit cheesecake bars on tiny crystal plates. I do not make the rules; I only make the mousse.
This recipe is part of my Cartoon Worlds, But Make It Dessert series, where I turn familiar animated worlds into original pastry designs through flavor, texture, color, and edible storytelling. Follow along on Instagram, TikTok, YouTube, and Facebook at @inspiredtotaste for more tiny pastry worlds.
That’s one enchanted cheesecake spell assembled. See you soon for the next layer.